Friday 16 January 2015

SYSLOG LOGGING

Configuration Cisco's Syslog Logging


If you are configuring a Cisco Router for syslog logging then please follow the steps below:
1) In order to ensure that logging is enabled, issue the logging on command.
Router(config)# logging on

2) In order to specify the Essentials server that is to receive the router syslog messages, issue the logging ip_address command. ip_address is the address of the server that collects the syslog messages.
Router(config)# logging 1.1.1.1 
3) In order to limit the types of messages that can be logged to the Essentials server, set the appropriate logging trap level with the logging trap informational command. The informational portion of the command signifies severity level 6. This means all messages from level 0-5 (from emergencies to notifications) are logged to the Essentials server.
Router(config) 
# logging trap informational
Valid logging facilities are local0 through local7.
Valid levels are:
7) emergency
6) alert
5) critical
4) error
3) warning
2) notification
1) informational
0) debug

4. In order to verify if the device sends syslog messages, check with the # sh logging command. You see all the syslog messages that are sent. If you do not see syslog messages, ensure that this is configured:
logging on / logging console / debug / logging monitor / debug logging trap debug

If you are configuring a Cisco Catalyst device for syslog logging please follow the steps below:
1. Ensure sure logging is enabled with the set logging server enable command.
Switch # set logging server enable
2. Specify the Essentials server that is to receive the router syslog messages, with the logging server_ip command. server ip is the IP address of the Essentials server.
Switch # set logging server 1.1.1.1
3. Limit the types of messages logged to the Essentials server. Enter set logging level informational, where informational signifies severity level 6. This means that all messages from level 0-5 (from emergencies to notifications) are logged to the Essentials server.
Switch # set logging server severity 6
4. In order to see if syslog messages are sent, use the # sh logging buffer command. You see syslog messages that are sent. 

Many more options are available to explore : Try some of these :

# set logging level all 7 default
# set logging server enable
# set logging server 1.1.1.1 (your unix syslog server ip address)
# set logging server facility LOCAL7
# set logging server severity 7 # syslog
# set logging console enable
# set logging server enable
# set logging server 1.1.1.1
# set logging level cdp 7 default
# set logging level mcast 7 default
# set logging level dtp 7 default
# set logging level dvlan 7 default
# set logging level earl 7 default
# set logging level fddi 7 default
# set logging level ip 7 default
# set logging level pruning 7 default
Enter: sh logging
output:
Logging buffer size: 500
timestamp option: enabled
Logging history size: 1
Logging console: enabled
Logging server: enabled {1.1.1.1}
server facility: LOCAL7
server severity: debugging(7)
Current Logging Session: enabled
The Cisco device is now configured for syslog logging.

Thursday 28 August 2014

Basics of IP and Sub-netting Short-cut.


IPv4 - Overview


MAC-Address - The physical address that is imprinted on the                           device, where a device can be an NIC card,                             Ethernet interface, Serial interface or any                             physical device (which can be touched and felt).

IP-Address - The logical address, assigned to particular host,                      for communication and sharing of resources. 
             ( It is not a fixed address for the host, i can                        randomly be assigned and  changed at any point                          of time according to our requirement.)


 1) Common question when we have a MAC address why do                       we need IP address ?
 A) Mac-address is the unique identification of the device,                 where as ip-address is used for the communication. 


IPv4 - Addressing


Each device that connects to the Internet needs a unique identifying number with which it communicate, called an IP address. IP stands for Internet Protocol.
There are two versions of IP that currently co-exist in the global Internet, IP version 4 (IPv4) and IP version 6 (IPv6). They will both be used for the foreseeable future, during the transition from IPv4 to IPv6. However, these two protocols cannot interact with each other directly. Systems that can use both protocols are called "dual stack", and provide facilities for exchanging data between IPv4 and IPv6.
Internet Protocol Addresses are made up of binary values and drive the routing of all data over the Internet. IPv4 addresses are 32 bits long, and IPv6 addresses 128 bits long. Since it is difficult for people to remember long sequences of numbers, the Domain Name System (DNS) was designed to provide a distributed directory of alphabetical names that correspond to these numbers.

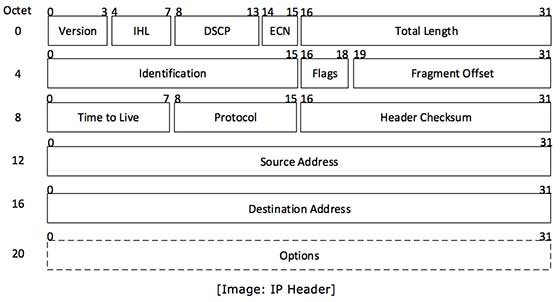
The encapsulated data is referred to as IP Payload. IP header contains all the necessary information to deliver the packet at the other end.

IP Header

IP header includes many relevant information including Version Number, which, in this context, is 4. Other details are as follows:
  • Version: Version no. of Internet Protocol used (e.g. IPv4)
  • IHL: Internet Header Length, Length of entire IP header
  • DSCP: Differentiated Services Code Point, This is Type of Service.
  • ECN: Explicit Congestion Notification, carries information about the congestion seen in the route.
  • Total Length: Length of entire IP Packet (including IP header and IP Payload)
  • Identification: If IP packet is fragmented during the transmission, all the fragments contain same identification no. to identify original IP packet they belong to.
  • Flags: As required by the network resources, if IP Packet is too large to handle these ‘flags’ tell that if they can be fragmented or not. In this 3-bit flag, the MSB is always set to ‘0’.
  • Fragment Offset: This offset tells the exact position of the fragment in the original IP Packet.
  • Time to Live: To avoid looping in the network, every packet is sent with some TTL value set, which tells the network how many routers (hops) this packet can cross. At each hop, its value is decremented by one and when the value reaches zero, the packet is discarded.
  • Protocol: Tells the Network layer at the destination host, to which Protocol this packet belongs to, i.e. the next level Protocol. For example protocol number of ICMP is 1, TCP is 6 and UDP is 17.
  • Header Checksum: This field is used to keep checksum value of entire header which is then used to check if the packet is received error-free.
  • Source Address: 32-bit address of the Sender (or source) of the packet.
  • Destination Address: 32-bit address of the Receiver (or destination) of the packet.
  • Options: This is optional field, which is used if the value of IHL is greater than 5. These option may contain values for options such as Security, Record Route, Time Stamp etc.


IPv4 supports three different type of addressing modes:


Unicast Addressing Mode:

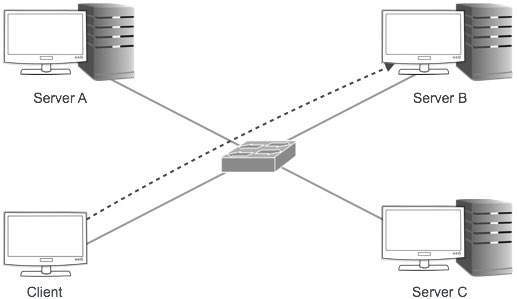
In this mode, data is sent only to one destined host. The Destination Address field contains 32- bit IP address of the destination host. Here client sends data to the targeted server:
Unicast Addressing


Broadcast Addressing Mode:

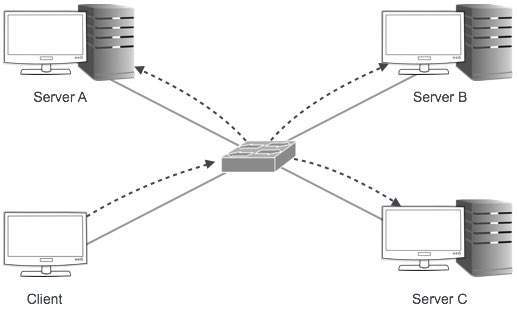
In this mode the packet is addressed to all hosts in a network segment. The Destination Address field contains special broadcast address i.e. 255.255.255.255. When a host sees this packet on the network, it is bound to process it. Here client sends packet, which is entertained by all the Servers:
Broadcast Addressing


Multicast Addressing Mode:

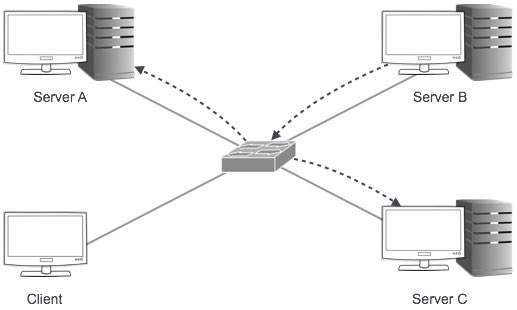
This mode is a mix of previous two modes, i.e. the packet sent is neither destined to a single host nor all the host on the segment. In this packet, the Destination Address contains special address which starts with 224.x.x.x and can be entertained by more than one host.
Multicast Addressing
Here a server sends packets which is entertained by more than one Servers. Every network has one IP address reserved for network number which represents the network and one IP address reserved for Broadcast Address, which represents all the host in that network.

 Subnet Mask


Identification of the Network Bits and Host bits.


so the default subnet mask values for the classes would be :                                                                 

Class A --        255.0.0.0                N.H.H.H
Class B --        255.255.0.0              N.N.H.H
Class C --        255.255.255.0            N.N.N.H
Class D --        
Class E --        Class D & E are called as FLAT NETWORKS, in                             which every ip address is an individual                                 address


The subnet mask is always an AND operation as represented in the diagram above.


Important  Note : 1) Two or more Ip-address are said to be in                                same address if both the Ip-addresses                                  NETWORK bits are common.
                     
                  2) Slash notation always represents the number                            of NETWORK bits. 


IPv4 - Subnetting


All the subnet mask values --


If we observer carefully the same values repeats again again and again in any subnet mask values but only differs only in case of position.


                       Values             A       B       C
and the values are       .0              /8      /16     /24
                         .128            /9      /17     /25
                         .192            /10     /18     /26
                         .224            /11     /19     /27                                     .240            /12     /20     /28
                         .248            /13     /21     /29
                         .252            /14     /22     /30
                         .254            /15     /23


These values.  Appear in the 4th Octet in case of classC
               Appear in the 3th Octet in case of classB  
               Appear in the 2th Octet in case of classA

Once you remember these values the entire sub-netting is done.

For example class C


To get no.of valid host per network :- 

 From the same values of  0,128,192,224,240,248,252.......
-->simply subtract to 254 .( As we all know 1st is network-id and                              the last is broadcast-id )


For example class B
    
Almost same concept applies here as well to know how many host per subnet.  

((256 - Values) * 256) - 2
                
i.e /23 value would be 254
         
                       ((256-254)*256) - 2 = 510


Note: In real time we can always approximate.(Multiply with 250)

The following table represents the values of class B


And the same rule applies for the class A                                                                                                                                              


Thank You Guys for the support.

Sunday 20 July 2014

Simplest form of PRIVATE--VLAN


    Private-Vlans :-


 Private-vlan is an important security related concept.


Private-vlan --
|
|
|---Primary Vlan - There will be one primary for every secondary vlan. All secondary                                                       vlan  can communicate  with the primary vlan.
|
|---Secondary Vlan - Every Secondary vlan will communicate with only primary vlan.                                                    No two secondary vlan will communicate with each other.                                   


                                   Types of secondary vlans 
                                                  |
                                                  |
                                             /        \
                                         /               \
              Community Vlan               Isolated Vlan
All pc's with in community vlan      All pc's with in isolated vlan 
will communicate each other.             will not communicate with each other    


Private Vlan's Configuration with every command explanation :-


# Vtp mode transparent ( Private-vlan will work only in this mode of vtp )

# vlan 10
# private-vlan community  à making vlan 10 as community vlan
# exit


# vlan 20
# private-vlan isolated à making vlan 20 as isolated vlan
# exit

# vlan 100
# private-vlan primary à making vlan 100 as primary
# private-vlan association 10,20 à associating 10,20 ( secondary vlan           
# exit                                                                                to primary )

# int range f 0/1 -2
# switchport mode private-vlan host à making the port access mode
# sw private-vlan host-association 100 10 à putting the port into specific vlan , first the primary and                                                                                   then the secondary vlan
#exit 

# int range f 0/3-4
# switchport mode private-vlan host
# sw private-vlan host-association 100 20
# exit

# int f 0/5 à interface where router/ server is connected
# switchport mode private-vlan promiscuous à making port as trunk
# switchport private-vlan mapping  100 10,20 à which vlan’s to be allowed from promiscuous port ,                                                                                 ( first primary then secondary )
# exit


To verify

#show vlan private-vlan

Primary Secondary Type              Ports
-------      --------        ---------           -----------------------------------------
100        10                community    fa 0/5, fa0/1, fa 0/2       
100        20                isolate            fa0/5, fa0/3, fa 0/4


Tuesday 8 July 2014

FTP and DNS


   What are the modes of FTP? 

A)  File Transfer Protocol, we use ftp in the process of transferring file from one device to the other.

On any system we can simply install FTP server software and it starts working like a FTP server. In terms of networking we use it for downloading or uploading the ios images from the routers mostly ( Not a very prominent use of ftp ).  Very effective between the transfer of files between the Server and Client. 

   There are two types of FTP.

Passive FTP: - In passive mode, the client establishes both channels (Data and control). In that case, the server tells the client which port should be used for the data channel.


Active FTP: - In active mode, the client establishes the control channel but the server establishes the data channel.


   What are the ports of DNS?


  Domain Name Server.

  DNS server is normally user to convert the IP-ADDRESS into NAME, and vice versa. 
 
    DNS use Port TCP & UDP 53.

  UDP/53 is used when a host or a router wants to resolve a domain name to an IP address (or vice versa).

  TCP/53 is used between two DNS servers when they want to sync or share their databases. Or If the size of the response message is more than 512 bytes, a TCP connection is used.

An example of DNS Lookups


Sunday 6 July 2014

IP - SEC

IP- Sec is the most used tunnel in creating the VPn site-to-site tunnel.


IKE - ( Internet Key Exchange Protocol )
  
Internet key Exchange 

  • It automates the negotiations process of the S.A.
  • Dead Peer Detection : Hello Timer 10 Sec.
In Which two major protocols are involved - 1) Isakmp 2) DH - Group

ISAKMP -  Internet Security Association and Key Management Protocol )

  • This protocol is used for the exchange of the POLICY and Transform Set's, S.A related to the IpSec tunnel formation.
DH-GROUP - ( Deffie Hellman Algorithum )

Used for the Exchange of the PASSWORD'S between two devices to establish  a  shared secret  over an unsecured communication like isakmp for IPSEC.

DH consists of the following options:
  • D-H Group 1 — 768-bit DH Group.
  • D-H Group 2 — 1024-bit DH Group. This group provides more security than group 1, but requires more processing time.
  • D-H Group 5 — 1536-bit DH Group. This group provides more security than group 2, but requires more processing time.


Hashing -

A process of date integrity with out the process of encryption. It makes sure that the date is not tampered till it is delivered to the destination by generating and verifying the HMAC values.


Which supports two types of protocols : MD5 and SHA.


Encryption -

A process of converting simple clear text into ----> cypher text ( which is not understandable by humans )

Used for the protection of the data.

Algorithms used are DES, 3DES, AES

Des -


3DES-


AES


ESP -  ( Encapsulation Security Payload )

Esp supports Encryption, Hashing, Authentication, Encapsulation and Optional Anti replay


AH - ( Authentication Header )

Ah supports Hashing, Authentication, Encapsulation and Optional Anti replay.

The only difference between ESP and AH is encryption process.


Two basic modes 1) Tunnel Mode 2) Transport Mode

Tunnel mode is used between TWO sites , where the encapsulation will take place ( adding a new header )

Transport mode is used with in the site, where there is no encapsulation.


Thursday 5 June 2014

Monitoring Your Network 


TCPView Tool
  1. Download the Tcpview Software, from the following link
      http://filehippo.com/search?q=Tcpview+Software
  2. TCPView is a Windows program that will show you detailed listings of all TCP and UDP endpoints on your system, including the local and remote addresses and state of TCP connections.
  3. TCPView also reports the name of the process that owns the endpoint. TCPView provides a more informative and conveniently presented subset of the Netstat program that includes with Windows.

    [Image: bb897437.tcpview(en-us,MSDN.10).jpg]
  4. The TCPView download includes Tcpvcon, a command-line version with the same functionality.
Tcpvcon Utility command
  1. Tcpvcon usage is similar to that of the built-in Windows netstat utility:
Code:
tcpvcon [-a] [-c] [-n] [process name or PID] -a    Show all endpoints (default is to show established TCP connections).
-c    Print output as CSV.
-n    Don't resolve addresses..
we can use the commands in simple command prompt of windows
Netstat Utility in Windows
  1. To display both the Ethernet statistics and the statistics for all protocols, type the following command:
    Code:
    netstat -e -s
  2. To display the statistics for only the TCP and UDP protocols, type the following command:
    Code:
    netstat -s -p tcp udp
  3. To display active TCP connections and the process IDs every 5 seconds, type the following command:
    Code:
    nbtstat -o 5
  4. To display active TCP connections and the process IDs using numerical form, type the following command:
    Code:
    nbtstat -n -o
  5. Store results of Any scan in text file:
    Code:
    netstat /a /n /o >c:\netstat.txt
Resolve common Netstat Utility Errors in Windows
  • If you just Goto Run > cmd > and type netstat it will show following Error:
    ‘netstat’ is not recognized as an internal or external command
  • Netstat Utility Runs with following directory:
    C:\WINDOWS\system32
  • Goto above directory & Type netstat commands then it will not show Errors.
  • Other way To Run this utility Which is: Directly press ctrl+r and Run netstat commands.
  • For More Help on Netstat utility type following command in ‘cmd’
    Code:
    netstat ?

Cisco IOS SPAN and RSPAN


Cisco Catalyst Switches have a feature called SPAN (Switch Port Analyzer) that lets you copy all traffic from a source port or source VLAN to a destination interface. This is very useful for a number of reasons:
  • If you want to use wireshark to capture traffic from an interface that is connected to a workstation, server, phone or anything else you want to sniff.
  • Redirect all VoIP calls from a VLAN so you can record the calls.
The source can be an interface or a VLAN, the destination is an interface. You can choose if you want to forward transmitted, received or both directions to the destination interface.
Cisco SPAN Example
When you use a destination interface on the same switch as your switch we call it SPAN, when the destination is a remote interface on another switch we call it RSPAN (Remote SPAN).  When using RSPAN you need to use a VLAN for your RSPAN traffic so that traffic can travel from the source switch to the destination switch.
Cisco Switch RSPAN Example
When you use RSPAN you need to use a VLAN that carries the traffic that you are copying. In the picture above you see SW1 which will copy the traffic from the computer onto a “RSPAN VLAN”. SW2 doesn’t do anything with it while SW3 receives the traffic and forwards it to a computer that has wireshark running. Make sure the trunks between the switches allow the RSPAN VLAN.
SPAN and RSPAN are great but there are a couple of things you need to keep in mind…

Restrictions

Both SPAN and RSPAN have some restrictions, I’ll give you an overview of the most important ones:
  • The source interface can be anything…switchport, routed port, access port, trunk port, etherchannel, etc.
  • When you configure a trunk as the source interface it will copy traffic from all VLANs, however there is an option to filter this.
  • You can use multiple source interfaces or a single VLAN, but you can’t mix interfaces and VLANs.
  • It’s very simple to overload an interface. When you select an entire VLAN as the source and use a 100Mbit destination interface…it might be too much.
  • When you configure a destination port you will lose its configuration. When you remove SPAN, the configuration is restored. In short…you can’t use the destination interface for anything else besides receiving traffic.
  • Layer 2 frames like CDP, VTP, DTP and spanning-tree BPDUs are not copied by default but you can tell SPAN/RSPAN to copy them anyway.
This should give you an idea of what SPAN / RSPAN are capable of. The configuration is pretty straight-forward so let me give you some examples…

SPAN Configuration

Let’s start with a simple configuration. I will use the example I showed you earlier:
Cisco SPAN Example
123
Switch(config)#monitor session 1 source interface fa0/1
Switch(config)#monitor session 1 destination interface fa0/2
You can verify the configuration like this:
Switch#show monitor session 1
Session 1
---------
Type                   : Local Session
Source Ports           :
    Both               : Fa0/1
Destination Ports      : Fa0/2
    Encapsulation      : Native
          Ingress      : Disabled
As you can see, by default it will copy traffic that is transmitted and received (both) to the destination port. If you only want the capture the traffic going in one direction you have to specify it like this:
Switch(config)#monitor session 1 source interface fa0/1 ?
  ,     Specify another range of interfaces
  -     Specify a range of interfaces
  both  Monitor received and transmitted traffic
  rx    Monitor received traffic only
  tx    Monitor transmitted traffic only
Just add rx or tx and you are ready to go. If interface FastEthernet 0/1 were a trunk you could add a filter to select the VLANs you want to forward:
Switch(config)#monitor session 1 filter vlan 1 - 100
This will filter VLAN 1 – 100 from being forwarded. If you don’t want to use an interface as the source but a VLAN, you can do it like this:
Switch(config)#monitor session 2 source vlan 1
Switch(config)#monitor session 2 destination interface fa0/3
I am unable to use session 1 for this because I am already using source interfaces for that session. It’s also impossible to use the same destination interface for another session. This is why I created another session number and picked FastEthernet 0/3 as a destination. So far so good? Let’s look at RSPAN!

RSPAN Configuration

To demonstrate RSPAN I will use a topology with two switches:
Cisco RSPAN SW1 SW2
The idea is to forward traffic from FastEthernet 0/1 on SW1 to FastEthernet 0/1 on SW2. There are a couple of things we have to configure here:
SW1(config)#vlan 100
SW1(config-vlan)#remote-span
SW2(config)#vlan 100
SW2(config-vlan)#remote-span
First we need to create the VLAN and tell the switches that it’s a RSPAN vlan. This is something that is easily forgotten. Secondly we will configure the link between the two switches as a trunk:
SW1(config)#interface fastEthernet 0/24
SW1(config-if)#switchport trunk encapsulation dot1q
SW1(config-if)#switchport mode trunk
SW2(config)#interface fastEthernet 0/24
SW2(config-if)#switchport trunk encapsulation dot1q
SW2(config-if)#switchport mode trunk
Now we can configure RSPAN:
SW1(config)#monitor session 1 source interface fastEthernet 0/1
SW1(config)#monitor session 1 destination remote vlan 100
This selects FastEthernet 0/1 as the source and VLAN 100 as the destination…
SW2(config)#monitor session 1 source remote vlan 100
SW2(config)#monitor session 1 destination interface fastEthernet 0/1
And on SW2 we select VLAN 100 as the source and FastEthernet 0/1 as its destination. Here’s the output of the show monitor session command:
SW1#show monitor session 1
Session 1
---------
Type                   : Remote Source Session
Source Ports           :
    Both               : Fa0/1
Dest RSPAN VLAN        : 100
SW2#show monitor session 1
Session 1
---------
Type                   : Remote Destination Session
Source RSPAN VLAN      : 100
Destination Ports      : Fa0/1
    Encapsulation      : Native
          Ingress      : Disabled
T0 all so ever it may concern  to . I hope this example is been helpful to you! If you enjoyed this article and are studying for CCNP SWITCH, you might enjoy reading the article.  Feel free to leave a comment if you have any questions.